

Step 1
Open up a new project at least 600px by 400px. Using the Ellipse Tool (L), click on the canvas. A dialogue box should appear. Enter a height and width of 100px. You should now have a perfect circle on your canvas. Give the circle a black Fill and no Stroke.

Step 2
Next, double-click the Crystallize Tool in the Tool Pallet. The Crystallize Tool can be found under the Warp Tool. A dialogue box should appear. Enter the setting indicated below, then click OK.

Step 3
Now with the Crystallize Tool selected, hover over the black circle. If you have Snap To Point activated you will notice the Crystallize Tool snap to the center of the circle. If Snap To Point is not activated, go to View > Snap To Point. Once the Crystallize Tool is snapped to the center of the black circle, click once with the mouse. Your shape should now look like the image shown below.

Step 4
Next, draw a new circle with a height and width of 120px centered over the old shape.

Step 5
With both shapes selected, hit the Intersect button in the Pathfinder Window (Window > Pathfinder).

Step 6
Now go to Object > Transform > Scale. Set the Scale to 200%, then click OK.

Step 7
Apply a Linear Gradient using a 10% gray and a 60% gray, make sure the lighter color is on the left. Give it a rotation of -24 degrees. The Gradient Pallet can be found under Window > Gradient.

Step 8
Now for the tricky part. With the Star Tool selected (the Star Tool can be found under the Rectangle/Ellipse Tool in the Tool Pallet), click on the canvas. A dialogue box should appear. Give Radius 1 a value of 190px, Radius 2 a value of 50px, and set the Points to 24, then click OK.
Now do it again, but this time give Radius 2 a value of 80px. You should now have two large 24 point stars. Now center all three shapes. You may have to nudge and rotate the star shapes slightly in order to line up the shapes to look like the image below.

Step 9
Now select the back most shape. Copy it (Edit > Copy), then Paste in Front (Edit > Paste in Front). This will make a duplicate of the shape directly in front of itself. With the duplicate selected, hold Shift and select one of the two 24 point stars created in Step 8. In the Pathfinder Window, hit the Intersect button (shown below). Copy & Paste in Front the back most shape once again creating another duplicate. With the duplicate selected, hold Shift and select the other 24 point star. Hit the Intersect button again. Your shapes should now look like the image shown below.

Step 10
Next, select the front most shape and give it a Linear Gradient using white and a 70% gray. Give the rotation a value of -90 degrees making sure that the white is at the top end.

Step 11
With the middle shape selected, give it a Linear gradient as well, but with a 50% and 20% gray. Give the rotation a value of -24 degrees and make sure that the darker color is at the top-left.

Step 12
Next, create a circle using the Ellipse Tool (L). Make sure it is 215px both high and wide. Center it, then give it a Linear Gradient using white and an 80% gray. Set the rotation to -45 degrees and make sure the white is at the top-left.

Step 13
Create another centered circle, this time 190px both high and wide. Give it a Linear Gradient using white and a 20% gray. Set the rotation to -45 degrees and make sure the white is at the top-left again.

Step 14
With both new circles selected, double-click the Blend Tool (W) in the Tool Pallet. A dialogue box should appear. Set the Spacing to Specified Steps and give it a value of 10, then Click OK. Now go to Object > Blend > Make.

Step 15
Now we’ll add some color. Select the back most shape, Copy it (Edit > Copy) then Paste in Back (Edit > Past in Back). This will duplicate the shape and place it behind the original. Color the duplicate red (R=220, G=0, and B=0).
Select all the shapes except the new red shape and Group them together (Object > Group). With the grouped object selected, go to the Transparency Window (Window > Transparency) and select Multiply from the drop-down menu. Your image should now look like that shown below.

Step 16
Now we can add some shine. To create the crescent shape, create two large circles 200px wide and tall. Center them over the artwork, then nudge the front circle to the left 7px and down 7px. With both circles selected, hit the Minus Front button in the Pathfinder Window. You should now have the crescent shape. With the shape selected, give it a Linear Gradient using white on both ends. Set the Opacity of the white color stop on the right side of the Gradient Slider to 0%. Also, set the rotation to -45 degrees.

Step 17
How about some text or a familiar logo? Simply pick your font and type out some text. Mickey Rossi was nice enough to let me use his font Ballpark Weiner for this tutorial. Make sure you place your text above the solid red layer, but below the grouped object. This will ensure that your logo has some of the shading on it otherwise it will look like it’s just floating in front of the image.

Step 18
So that’s one, but how about the competition? Make a copy of the existing object. Draw a rectangle with the Rectangle Tool (M) 300px wide by 100px high. Center it over the artwork.

Step 19
With the new rectangle selected, go to Effect > Warp > Flag. Set the Bend to 25% and click OK.

Step 20
Next, with the rectangle still selected, go to Object > Expand Appearance. Your shape should look like that shown below.

Step 21
Now with both the flag shaped rectangle and the red background shape selected, hit the Divide button in the Pathfinder Window.

Step 22
Delete the two extra shapes on the left and right. Leave the top shape colored red, color the middle shape white, and color the bottom shape blue (R=0, G=45, and B=130). Now with all three colored shapes selected, go to Object > Arrange > Send To Back. You object should now look like the image shown below.

Step 23
Now bring back in your text or logo. I repositioned the 5 cent mark to the top-left and re-colored the text red. Remember to place the logo above the colored shapes, but below the grouped object.

Step 24
To enhance the text to make it look more like the competitor’s vintage logo, select the text minus the 5 cent mark and go to Effect > Warp > Flag. Set the Bend to 30 and click OK.

Step 25
In the Transform Pallet (Window > Transform), set the rotation to 5 degrees.

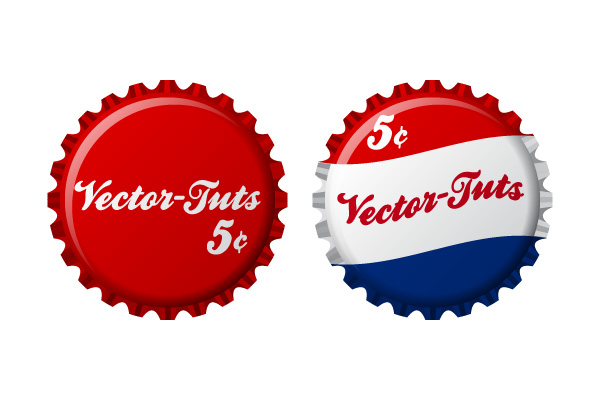
Conclusion
There you have it, a simple vintage vector bottle caps, just like that!


0 comments:
Post a Comment